
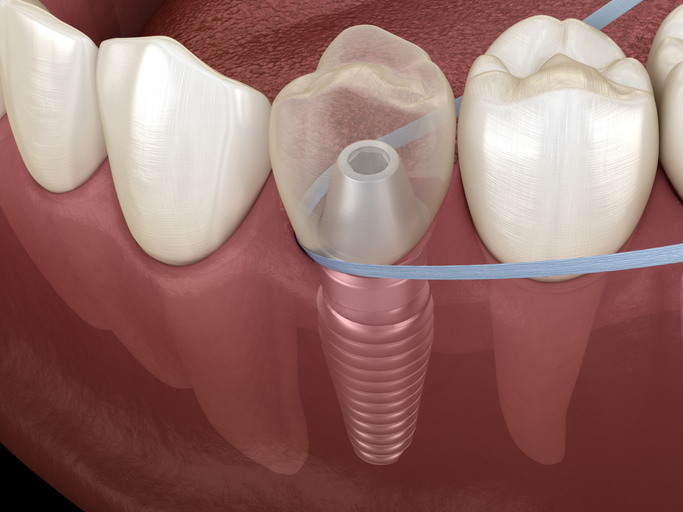
Dental implants are one of the most reliable and long-lasting solutions for replacing missing teeth—but only if you care for them properly. While implants aren’t susceptible to decay like natural teeth, the tissues and bone around them can still become inflamed or infected. In fact, improper cleaning is one of the leading causes of implant failure due to peri-implantitis, a gum disease-like condition that causes bone loss around the implant.
The good news? Cleaning around dental implants doesn’t have to be complicated, but it must be thorough and consistent. In this guide, you’ll learn exactly how to clean your implants like a pro—using dentist-approved techniques and tools that keep your investment healthy for the long haul.
Why Implant Cleaning Is Different Than Natural Tooth Care
Natural teeth are supported by a ligament called the periodontal ligament, which provides blood flow and immune defenses. Implants, on the other hand, are fused directly into the jawbone without this protective cushion. That means:
- Less immune defense around the implant
- Plaque buildup is more dangerous to surrounding tissues
- Inflammation spreads faster and can lead to bone loss
This makes preventive care even more critical around implants than around natural teeth.
Daily Implant Cleaning Routine (Step-by-Step)
1. Use a Soft-Bristled Manual or Electric Toothbrush
Choose a toothbrush with soft, rounded bristles to avoid damaging gum tissue. Electric toothbrushes like the Philips Sonicare or Oral-B iO are especially effective at removing plaque and biofilm without excess pressure.
Technique:
- Angle the brush at 45 degrees toward the gumline.
- Use gentle, circular motions or follow the electric brush’s built-in timer.
- Brush for 2 full minutes, twice a day.
Don’t skip the implant—even if it “feels clean.”
2. Floss With Implant-Safe Tools
Traditional string floss can sometimes shred around implants or miss areas entirely. Instead, use tools specifically designed for implants:
Best Options:
- Implant-specific floss (e.g., Super Floss, Bridge & Implant Floss) – These have a stiff end, spongy middle, and standard floss end.
- Interdental brushes with plastic-coated wire (TePe, GUM Proxabrush) – Perfect for cleaning between implant crowns and bridges.
- Water flossers (e.g., Waterpik with Implant Tip) – Excellent for flushing plaque and bacteria below the gumline.
Technique:
- Wrap implant floss gently around the base of the implant crown in a C-shape.
- Move back and forth to clean beneath the crown and under the gumline.
- Use interdental brushes gently without forcing them—choose a size that fits snugly but comfortably.
3. Rinse With Antimicrobial Mouthwash
Daily rinsing helps reduce the bacterial load around your implant sites.
Dentist-recommended mouthwashes:
- Chlorhexidine gluconate (prescription, short-term use only)
- Alcohol-free antiseptic rinses (e.g., Crest Pro-Health, ACT Total Care)
- Xylitol-based rinses for added antimicrobial effect
Tips:
- Swish for 30–60 seconds.
- Avoid rinsing with water afterward to maintain effectiveness.
4. Clean Under Implant Bridges or Dentures
If you have All-on-4 implants, implant-supported bridges, or overdentures, you’ll need to clean underneath the prosthesis where food and bacteria hide.
Recommended tools:
- Sulcus brushes (narrow, single-tuft brushes for tight spaces)
- Water flossers with plaque seeker tips
- Rubber tip stimulators to gently dislodge debris
- Oral irrigators with antimicrobial rinses
Technique:
- Focus on the gumline and under the prosthesis.
- Use a mirror to inspect hard-to-reach areas.
- Spend extra time in posterior (back) regions where buildup is most common.
How Often Should You Clean Around Implants?
| Task | Frequency |
|---|---|
| Brushing | 2x daily |
| Flossing / Water Flossing | 1–2x daily |
| Antimicrobial Rinse | 1–2x daily |
| Interdental Cleaning | Daily |
| In-Office Checkups | Every 3–6 months (or as advised) |
Signs You’re Not Cleaning Effectively
If you notice any of the following, it may indicate inflammation around your implants, prompting the need for immediate dental evaluation:
- Bleeding when brushing or flossing
- Persistent bad breath or a metallic taste
- Swelling or puffiness around the implant
- Implant crown feels slightly loose or tender
- Pus, discharge, or gum recession
Don’t wait—early intervention can prevent irreversible bone loss.
Pro Tips from A Periodontist
- Label your tools: Use a separate brush or flosser exclusively for implants to avoid cross-contamination.
- Travel kit: Keep a portable implant care kit with floss, picks, and rinse when away from home.
- Regular maintenance visits: Dental hygienists use special instruments that won’t scratch implant surfaces. Skipping cleanings increases long-term risk.
Invest Time to Protect Your Investment
Dental implants can last 20 years or more—but only with proper care. While the routine may take a little extra time compared to caring for natural teeth, it’s a small investment in keeping your smile strong, stable, and infection-free.
Need help choosing the right tools for your implant type? At Dr. David Scharf’s office, we tailor implant maintenance plans for every patient and offer hands-on guidance for daily home care.
Contact us today to schedule an implant checkup or personalized hygiene consultation.